|
WARNING: Invoking the test described below will result in the clearing of data
memory, program memory, and mode settings.
My TI-81 has ROM version 1.8K, so your mileage may vary. (See below for notes on other
TI-81 ROM versions I have encountered.)
Caution: Adjust the calculator contrast to 0 (very light) before beginning the self-test
to make sure the calculator's batteries are not too weak to be able to see the display
during and after executing the self-test. Do not perform this self-test with weak
batteries. Several display test patterns use a contrast setting of 0, and the contrast is
set to 0 upon completion of the self-test.
Three tests will be performed: what appears to be a RAM test, a display test, and a
keyboard test. Each test is aborted by pressing the "ON" key.
The self-test function is entered by pressing "2nd", "TEST", "ALPHA", and "S". The
calculator will display the message "Self test?" followed by the ROM version. Press
"ENTER" to proceed, or any other key to abort the self-test without clearing the calculator.
RAM test.
The first test appears to be a RAM test. Starting at zero, a number in the center of the
display starts incrementing every half second. This test will continue indefinitely
until "ON" is pressed to start the display test.
Display test.
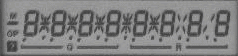
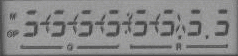
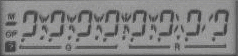
Press "ON" to halt the RAM test and start the display test. The display test consists
of five different test patterns (all pixels on, all pixels off, alternate pixels on
(checkerboard pattern), horizontal lines (alternate rows of pixels), vertical lines
(alternate columns of pixels)) and thirty-two contrast settings. Press any key, except
"ON", to step through the different test patterns. The first contrast test pattern will
be maximum contrast, with all pixels black; press any key, except "ON", thirty-one more
times to complete the display test. The vertical line test pattern will slowly reappear
as the contrast changes.
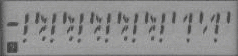
Keyboard test.
The keyboard test starts with "11" (row 1, column 1) displayed in the center of the display.
This is the key code for the "Y=" key in the upper-left corner of the keyboard. The order
of keys pressed proceeds generally left-to-right, top-to-bottom, skipping the "ON" key. The
key code prompt will not increment if a key is pressed out of order or the key does not
work. The keyboard test successfully completes with "OK" displayed.
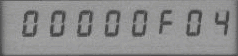
Press any key to complete the self-test. "Mem cleared" is displayed.
Other TI-81 ROM versions.
The following are differences in the self-test function as documented above.
ROM version 1.1: RAM test takes approximately 4.5 seconds per cycle; ten contrast
settings during the display test.
Rom version 1.6K: ten contrast settings during the display test.
Rom version 2.0V: only three display test patterns (vertical lines, horizontal lines, and
a combination checkerboard and vertical bar pattern) with no contrast test; the keyboard
test starts with "49" displayed and decrements this count as each key is pressed in order
starting with the "Y=" key.
|