
Second test pattern

Third test pattern

Fourth test pattern
|
WARNING: Invoking the test described below will result in the clearing of data memory. The display self-test for the EC-293 (Cat. No. 65-423) is invoked by pressing the reset button located on the back of the calculator. Two nearly identical test patterns will be displayed for approximately one second each before the calculator clears itself. The first test pattern energizes all segments at maximum contrast. The second test pattern energizes all segments at normal contrast. |
|
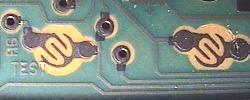
WARNING: Invoking the test described below may result in the clearing of data memory, program memory and mode settings. Further, this test requires partial disassembly of the calculator and possible modifications, which could result in permanent damage. See disclaimer before dissassembly or modification. The display self-test for the EC-4033 is invoked by repeated closure of the "TEST" pad located on the back of the PCB of the calculator. Four test patterns are displayed, each after the closure of the test pad. The first test pattern is a blank display, the second pattern is all segments energized, the third and fourth patterns energize alternate segments. Pressing AC, or the RESET button exits the self-test mode. |
|
Second test pattern |
Third test pattern |
Fourth test pattern |
|
This TEST pad, which is labeled "TEST" and looks like a regular key contact pad, is located on the back of the PCB approximately 1.6 cm above above the RESET button/pad. Accessing it requires removal of the back metal battery compartment cover, then removal of the back body of the calculator. The back body lifts off after all screws are removed, which also disconnects the batteries from the calculator. |
|
|
I chose to make a minor modification to my calculator to facilitate access to the test function. I first drilled a small hole though the plastic back body directly over the TEST pad. This hole is approximately the same size as the hole for the reset button. Then, I then affixed a rubber key dome with its conductive black pad, (taken from a dead calculator) over the TEST pad with double-sided tape. Finally, I replaced the back body of the calculator. Note, I did not drill a hole in the metal battery compartment cover. (Based on several factors, I believe this calculator was manufactured by Casio, is functionally identical to the Casio fx-6300G.) |

|

|
|
WARNING: Invoking the test described below will result in the clearing of data memory, program memory, and mode settings. The EC-4034 has built-in internal, display, and keyboard tests. With the calculator off, the test mode is activated by pressing and holding the F6 and a b/c keys, then pressing the AC key. A menu of test options is presented. Each test is activated by pressing the number for the appropriate test. The display test, test number 1, requires pressing the EXE key to step through each of five test patterns until the test option menu is again displayed. (Note that the first test pattern is all pixels off.) The keyboard test, test number 2, requires the pressing of each key in order, generally from the upper-left, to the lower-right (the order the cursor keys need to be pressed is a little unusual). The calculator prompts you to press the appropriate key. The RAM test, test number 3, will display "<< RAM OK >>" when the test finishes successfully. Press the EXE key to return to the test option menu. The ROM test, test number 4, displays what appears to be a checksum (my calculator displays 0112C62E) when the test finishes. The EXE key must be pressed to return to the test option menu. Test number 5 is the transmit/receive test for the data link. The test mode is exited by selecting option zero. RAM is automatically cleared as evidenced by the "** RESET ALL **" message. |
|
WARNING: Invoking the test described below will result in the clearing of data memory, program memory, and mode settings. The EC-4040 has built-in display test. With the calculator off, the display test is activated by pressing and holding the MODE and (-) (change sign) keys, then pressing the AC key. The display test consists of four test patterns, all pixels/indicators off, all pixels/indicators on, and two patterns of alternate pixels/indicators. Pressing the AC key steps through the four test patterns. Pressing AC after the fourth test pattern exits the display test function. (Based on several factors, I believe this calculator was manufactured by Casio, is functionally identical to the Casio fx-P401.) |
|
WARNING: Invoking the test described below will result in the clearing of data memory and mode settings. The EC-5500 has built-in display test. The display test is activated by pressing and holding the STO, 4, 5, and 6 keys, then pressing the AC/ON key. (Alternatively, press and hold 6, X (multiply), 3, and - (minus), then press AC/ON to activate the display test.) The calculator will start off displaying "88888888" with all the mode indicators in the top half of the display turned on, along with some of the function icons displayed in the bottom half of the display under the touch pads. The second and fourth rows of function icons will remain on, and the first and third rows will be cycled on and off. One decimal point and comma will shift right to the right as the test cycles. Further, the 8888888888 will start decrementing. The display test will continue as long as there is sufficient light for the solar panel to produce power for the calculator, or until AC/ON is pressed to exit the display test. (Based on several factors, I believe this calculator was manufactured by Texas Instruments, is functionally identical to the TI Business Edge.) |
Last updated April 2, 2006