|
WARNING: Invoking the test described below may result in the clearing of data
memory, program memory, and mode settings.
The HP-39G has built-in internal, display, and keyboard test functions. These functions
are accessed by pressing and holding the ON key then pressing one of the keys on the
top row of the keyboard, as is done on many other late model HP calculators.
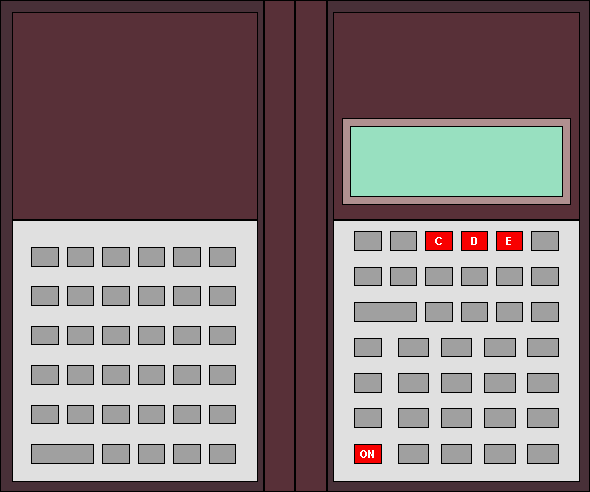
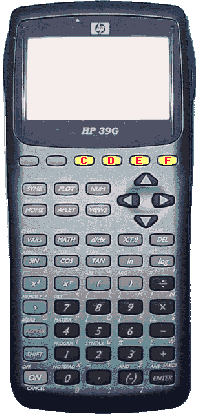
A continuous internal/display test is performed by simultaneously pressing the ON key
and the fifth key (labeled "E" in the illustration to the right) on the top row. This
test will cycle through ERAM, CPU, RAM, and display tests, then briefly display "HP 39/40 OK"
before starting again. This cycling test is cancelled by simultaneously pressing the ON
key and the third key (labeled "C" in the illustration to the right) on the top row.
Individual tests can be performed by simultaneously pressing the ON key and the fourth
key (labeled "D" in the illustration to the right) on the top row. A menu listing seven
test options will be displayed. These test options are Hard, Cpu, Kbd1, Kbd2, FullRAM,
RS232, and IR. Press the appropriate number for the test. This test mode can be exited
either by pressing ON, or simultaneously pressing ON and the third key
(labeled "C" in the illustration to the right) on the top row.
- 1: Hard. This test displays the messages "Write to ERAM OK" and "Calculator is
HP39G."
- 2: Cpu. This is the CPU test, and displays three lines of results.
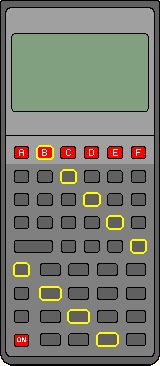
- 3: Kbd1. This test requires you to press each key from left to right, from the
top row to the bottom row. The Up-Cursor key is the right most key of the second row. The
Left-Cursor, Down-Cursor, and Right-Cursor keys are the last three keys of the third row.
The calculator beeps as each key is pressed. If a key is pressed out of order or bounces,
a different beep is heard and a four-digit hexadecimal number will be displayed, and the
test will expect the remaining 51 key depressions before displaying a failure message. Upon
successful completion of the test, the message "Kbd1 OK" is momentarily displayed before
the test menu is redisplayed.
- 4: Kbd2. This test required you to press only some of the keys on the keyboard.
(The HP-48GX Kbd2 test appears to test keyboard scan lines, so presumably this test does
the same thing.) The following keys must be pressed in the following order to successfully
finish this test: the six keys on the top row from left to right, SYMB, PLOT, NUM, HOME,
APLET, VIEWS, Cursor-Left, and finally the Comma key. If a key is pressed out of order or
bounces, a different beep and a four-digit hexadecimal number will be displayed. The message
"Kbd2 OK" is momentarily displayed upon successful completion of the test.
- 5: FullRAM. This test tests all 256K of RAM in the calculator. "OK" is displayed
as the test of each 128K bank is completed.
- 6: RS232. Tests the RS232 I/O port.
- 7: IR. Tests the IR I/O port.
- ON: Reboot. Exits the self test function and resets the calculator.
A quick test can be performed by simultaneously pressing ON and the sixth key (labeled
"F" in the illustration to the right) on the top row. This test cycles through the ERAM,
CPU, RAM, display, Kbd2, RS232 and IR tests. This test can be exited by pressing ON and
the third key (labeled "C" in the illustration to the right) on the top row simultaneously.
|
 |